By Anthony Lur, Product Marketing Specialist, FARO Technologies
Today, manufacturing practices are evolving to highlight ‘cyber-physical’ production systems controlled with smart products and the far-reaching internet cloud. With regards to quality control for the automotive industry, the ‘smart’ factory revolution has brought about changes in manufacturers’ measurement needs. For an industry such as automotive manufacturing that carries out high volumes of inspection daily, 3D coordinate measurement is indispensable to its operations. There are some ways that the technology contributes to better running automotive production in the new manufacturing environment.
In-line Inspection
As a result of changing market demands, the automotive industry’s measurement needs have also evolved over the years. Manufacturers used to rely on fixed coordinate measurement machines (CMMs) to perform inspection checks. While highly precise, one of the greatest drawbacks, however, was the device’s inability to provide accurate results in thermally unstable environments like the shop floor.
In response to automotive manufacturers’ cost-control needs, metrology suppliers began to develop devices that maximize efficiency, by eliminating the time and effort that manufacturers spent on transporting components to and from measurement rooms. The portable CMM – a robust device that provides highly accurate readings even under the harsh conditions of the shop floor – was thus born. In essence, inspection checks are being moved closer to the production line, to a point where manufacturers demand the ability to complete tasks without even moving components off the line.
Production Part Approval Process (PPAP)
The digital data that 3D coordinate technology provides is exceptionally useful for manufacturers that practice Production Part Approval Process (PPAP). Regardless of where along the supply chain a component supplier is present, the PPAP industry standard requires that each item of output fulfils design specifications consistently, as spelt out by the client. In that way, the automotive manufacturer is given full assurance of its component suppliers and their production processes. 3D coordinate technology has facilitated the execution of PPAP in the automotive industry today. The speed and consistency in which measurements are acquired by 3D coordinate devices enable both suppliers and manufacturers to communicate their requirements and results clearly and easily.
Machine-to-machine (M2M)
Collaboration in a smart factory environment where machines ‘talk’ to one another, precision and automated inspection are key factors for manufacturers to achieve efficiency. Today, there are 3D measurement devices that provide those capabilities to make M2M collaboration a reality.
Highly-flexible Mass Production
Changes in market demand for non-standard auto parts imply that manufacturers need to possess highly flexible production systems. To cope with varied needs, manufacturers seek out versatile tools that handle multiple applications and flexible part volumes, so as to cater to as many options as possible at the lowest cost.
Digital Engineering
With the emergence of this engineering discipline, manufacturers have been able to improve and develop their production processes and output with better accuracy and consistency. Advancements in 3D coordinate technology, in particular point cloud solutions, have caused the trend to escalate further.
Big Data
Cloud Computing Part of that which supports the change in the new manufacturing landscape is the growing popularity of cloud computing and big data analytics. The availability of cloud-based applications for 3D coordinate measurements enables data consistency and integrity, allowing resources (eg. software information) to be shared across readily.
Automotive Applications of 3D Coordinate Technology
Each of the 3D coordinate measurement devices introduced earlier suit different needs, and here are some real-life examples of how some automotive players make use of FARO solutions in research and development, in-line inspection, as well as for the inspection of large components
Research & Development
Mitsubishi Motors Corporation, the world leader in mass production of electric vehicles (EV), has one of its production bases in Okayama, Japan – a place where many other automobile-related companies choose to locate. Founded in 2011, Okayama Vehicle Engineering Center for the next EV (OVEC) is a network of 16 companies from the prefecture, formed in response to the changing automobile industry. OVEC was built with the next EV in mind, and equipped with the latest production systems that the industry endorsed. Since its inception, OVEC rolled out its prototype vehicle, known as the OVEC-ONE, at the Automotive Engineering Exposition 2013.
The development of OVEC-ONE was based on Mitsubishi’s Galant Fortis model. To convert it into an EV, unwanted components such as the car engine had to be removed and replaced with other components (eg. inverter, battery, compressor and heater). The challenge was to layout 10 new components of varied sizes and shapes thoughtfully in the available space.
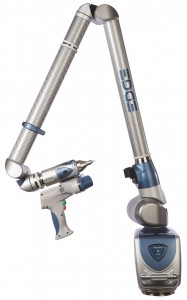
To ensure that all the equipment fits in the space under the hood, the team acquired 3D data of each item with non-contact measurement, using FaroArm. With the 3D CAD data, the team decided on the layout virtually, checking that the components do not interfere with each other.
When asked about the design process of the equipment layout, Shiro Aikawa, Coordinator of OVEC, said, “3D measurement of the various components was necessary as they varied so widely in shape and size. Many of them were hard to measure with a caliper or tape measure. The FaroArm allowed us to efficiently complete the layout of the hood interior in a short period of time.” In fact, individuals from the automotive industry have unanimously expressed their admiration for the EV’s logical equipment line-up beneath the hood.
In-line Inspection
Founded in 1991, FAW-Volkswagen Automotive Co., Ltd is a Chinese joint venture between FAW Group Corporation and the Volkswagen Group. Over in its Chengdu plant in China, FAW-Volkswagen specializes in the production and assembly of the Jetta and Sagitar car models. A large component of the assembly line is the conveyor system on which all the vehicles are transported. Any failure in this system would effectively cripple all other departments within the facility, so in order to ensure that each plant operates at its optimum, the company put in place a number of processes to minimize downtime on its shop floor.
FAW-Volkswagen utilises an overhead conveyor to move vehicles around the plant, and regular inspection and alignment checks on the equipment are necessary to ensure optimal performance. Common areas of interest requiring inspection include anchor points on the cradle support structure, corresponding anchor points on the conveyor trolley, and relative distances between work piece and center axis. These measurements vary in nature, and range anywhere between 2 to 4m in length.
Traditionally, the technicians rely on hand tools such as tape measures, gauges, micrometers, and spirit levels to get the job done. However, these traditional methods were not ideal in more ways than one. “To begin with, accuracy levels achieved are lower with hand tools,” shared Zhou Tingzhi, an engineer from the Assembly Shop Maintenance department. “At times, complex measurements would require several procedures, and these would accumulate large error margins. It would also take us a long time to perform the measurements and calculations manually.”
The company now deploys a 12-ft FaroArm on the maintenance platform, located right next to the assembly line. Whenever a glitch occurs on the production line, the team would use the device to pinpoint the precise problem area before zooming into it. Since then, FAW-Volkswagen’s inspection and alignment checks on its manufacturing systems have become much more precise and simple. This, in turn, has kept the plant operating at its best. Zhou revealed, “Now, equipment alignment and inspection of check fixtures can all be done with just one tool. With the FaroArm, we can accomplish our measurement task, which has a volumetric size of 4m and below, at an accuracy of up to 0.02mm. We have eliminated the possibility of human error, and greatly increased the precision levels by switching to FARO.”
Inspection Checks on Large Components
Komatsu, a mining and construction equipment manufacturer, develops and produces large dump trucks and wheel loaders in its Ibaraki plant in Japan. One of the main challenges that the Quality Assurance (QA) department at Ibaraki faced was in the inspection of large parts. As the Ibaraki plant manufactures large-sized construction machinery, even the parts that the team has to deal with are enormous. It is common for a machinery frame alone to exceed 2m, which makes inspection both labor-intensive and time-consuming.
Importantly, the QA team faced problems with accuracy and repeatability when they relied on hand tools (e.g. ruler, plumb) and a layout machine for measurement checks. On top of that, Komatsu also found the quality management of parts provided by partner companies to be a challenge. Whenever a large part is deemed defective after arriving at the Ibaraki plant, it would have to be returned for rework, which would delay the final delivery and also incur extra costs for transportation.
Through recommendations by colleagues from other Komatsu plants, Yoshioh Nihei from the Inspection Section (QA Department) decisively invested in the FARO® Laser Tracker Vantage. Since its implementation, the team reduced measurement time for machinery frames from 1.5 days to just a day, with an added capability to measure complex features (eg. mounting holes) on a part.
Amongst all the benefits enjoyed by Komatsu, the one that is most appreciated by the team at Ibaraki is its portability, because measurements can be performed directly at partner companies’ production sites. By identifying defects early, before a faulty part is introduced into the manufacturing process, the team eliminates the extra costs and time that would have been incurred for rework. It also greatly enhances the production and delivery time for the company. Manabu Kobori, the Foreman of the Component Inspection Center (Inspection Section, QA Department of Komatsu’s Ibaraki Plant) chimed in agreement, “When we visit partner companies and take measurements on-site using the Vantage, we are able to manage the processes from production to quality assurance in a consistent manner, thereby enhancing the quality of our products.”
With FARO, 3D measurement and documentation needs can be fulfilled confidently. As a pioneer and market leader in portable computer-aided measurement, FARO consistently applies the latest advances in technology to make its industry-leading product offerings more accurate, reliable, and easy to use. The focus is on simplifying workflow with tools that empower customers, thereby dramatically reducing the on-site measuring time and lowering overall costs.





Leave a Reply